One-Two Punch Setup
The One-Two Punch Setup is the core Volatility Box entry: the breach is punch one, and the confirmation you layer on top is punch two. The breach tells you that you have a volatility edge; the confirmation tells you the move is actually exhausting and turning. Together they turn a breach into a tradable setup with defined entry, stop, and target rules. It trades on confirmation, not prediction.
Watch: Part 5 of the Volatility Box onboarding series.
What the One-Two Punch Setup Is
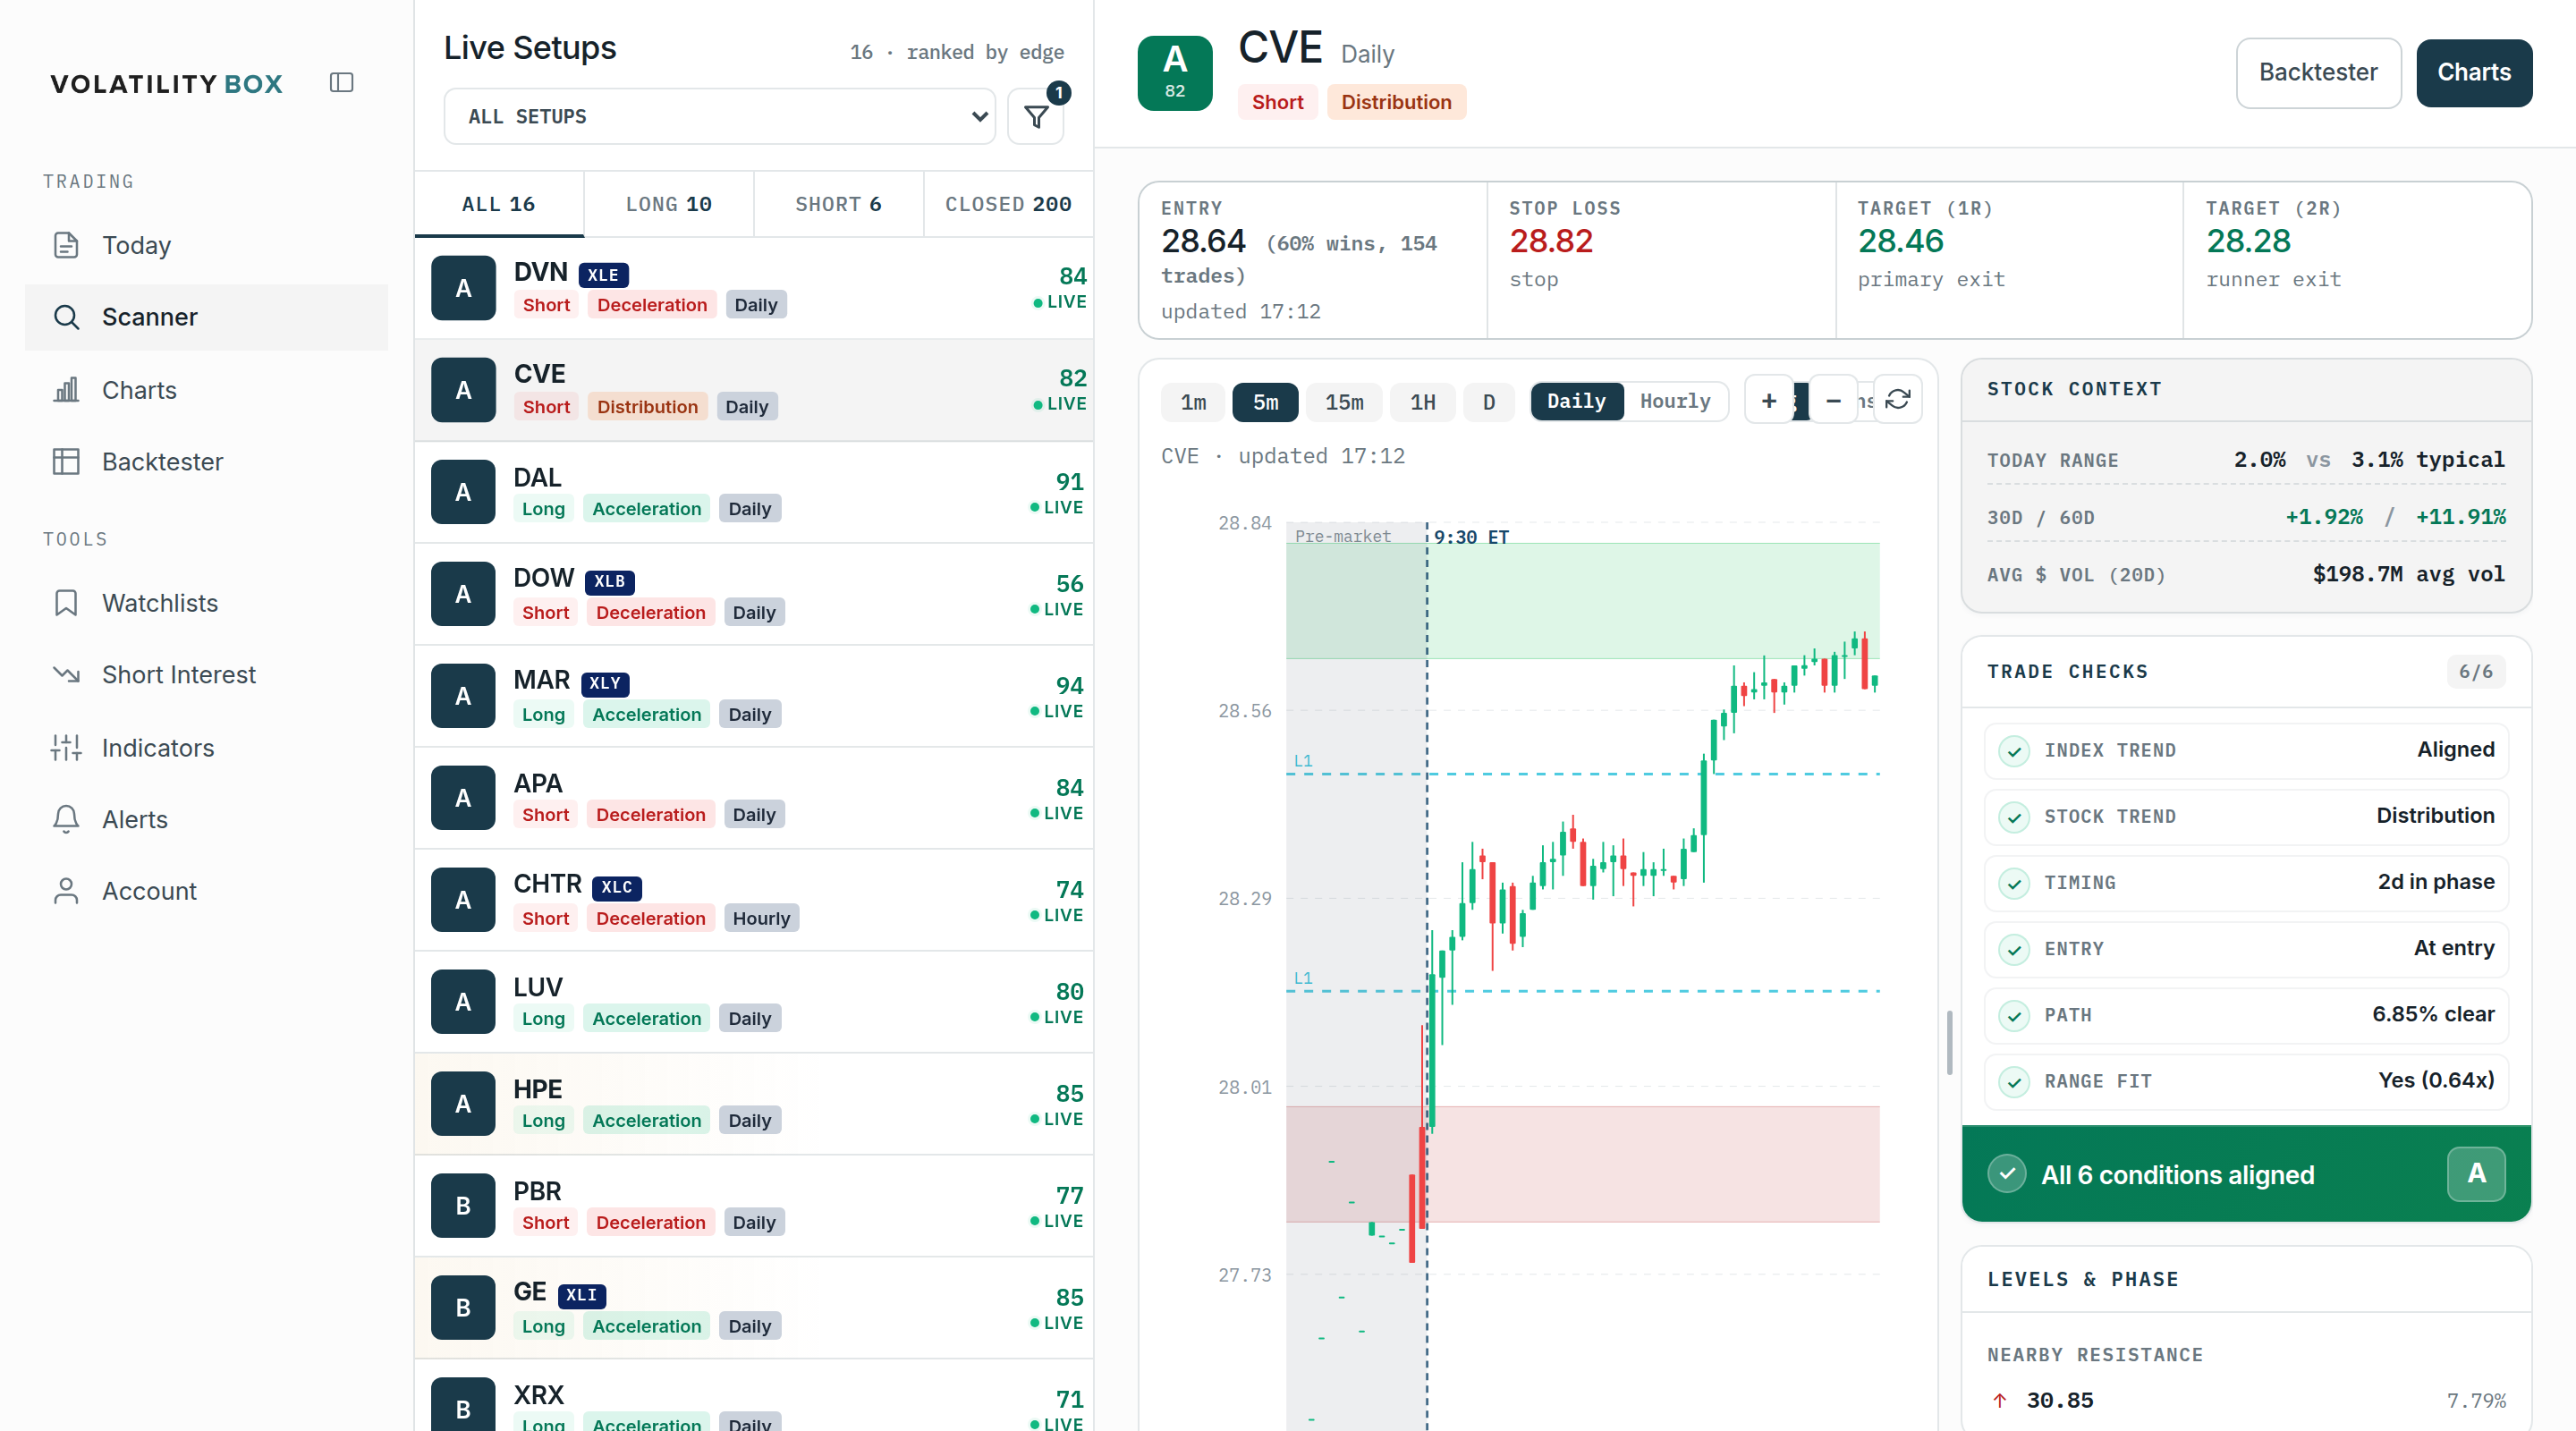
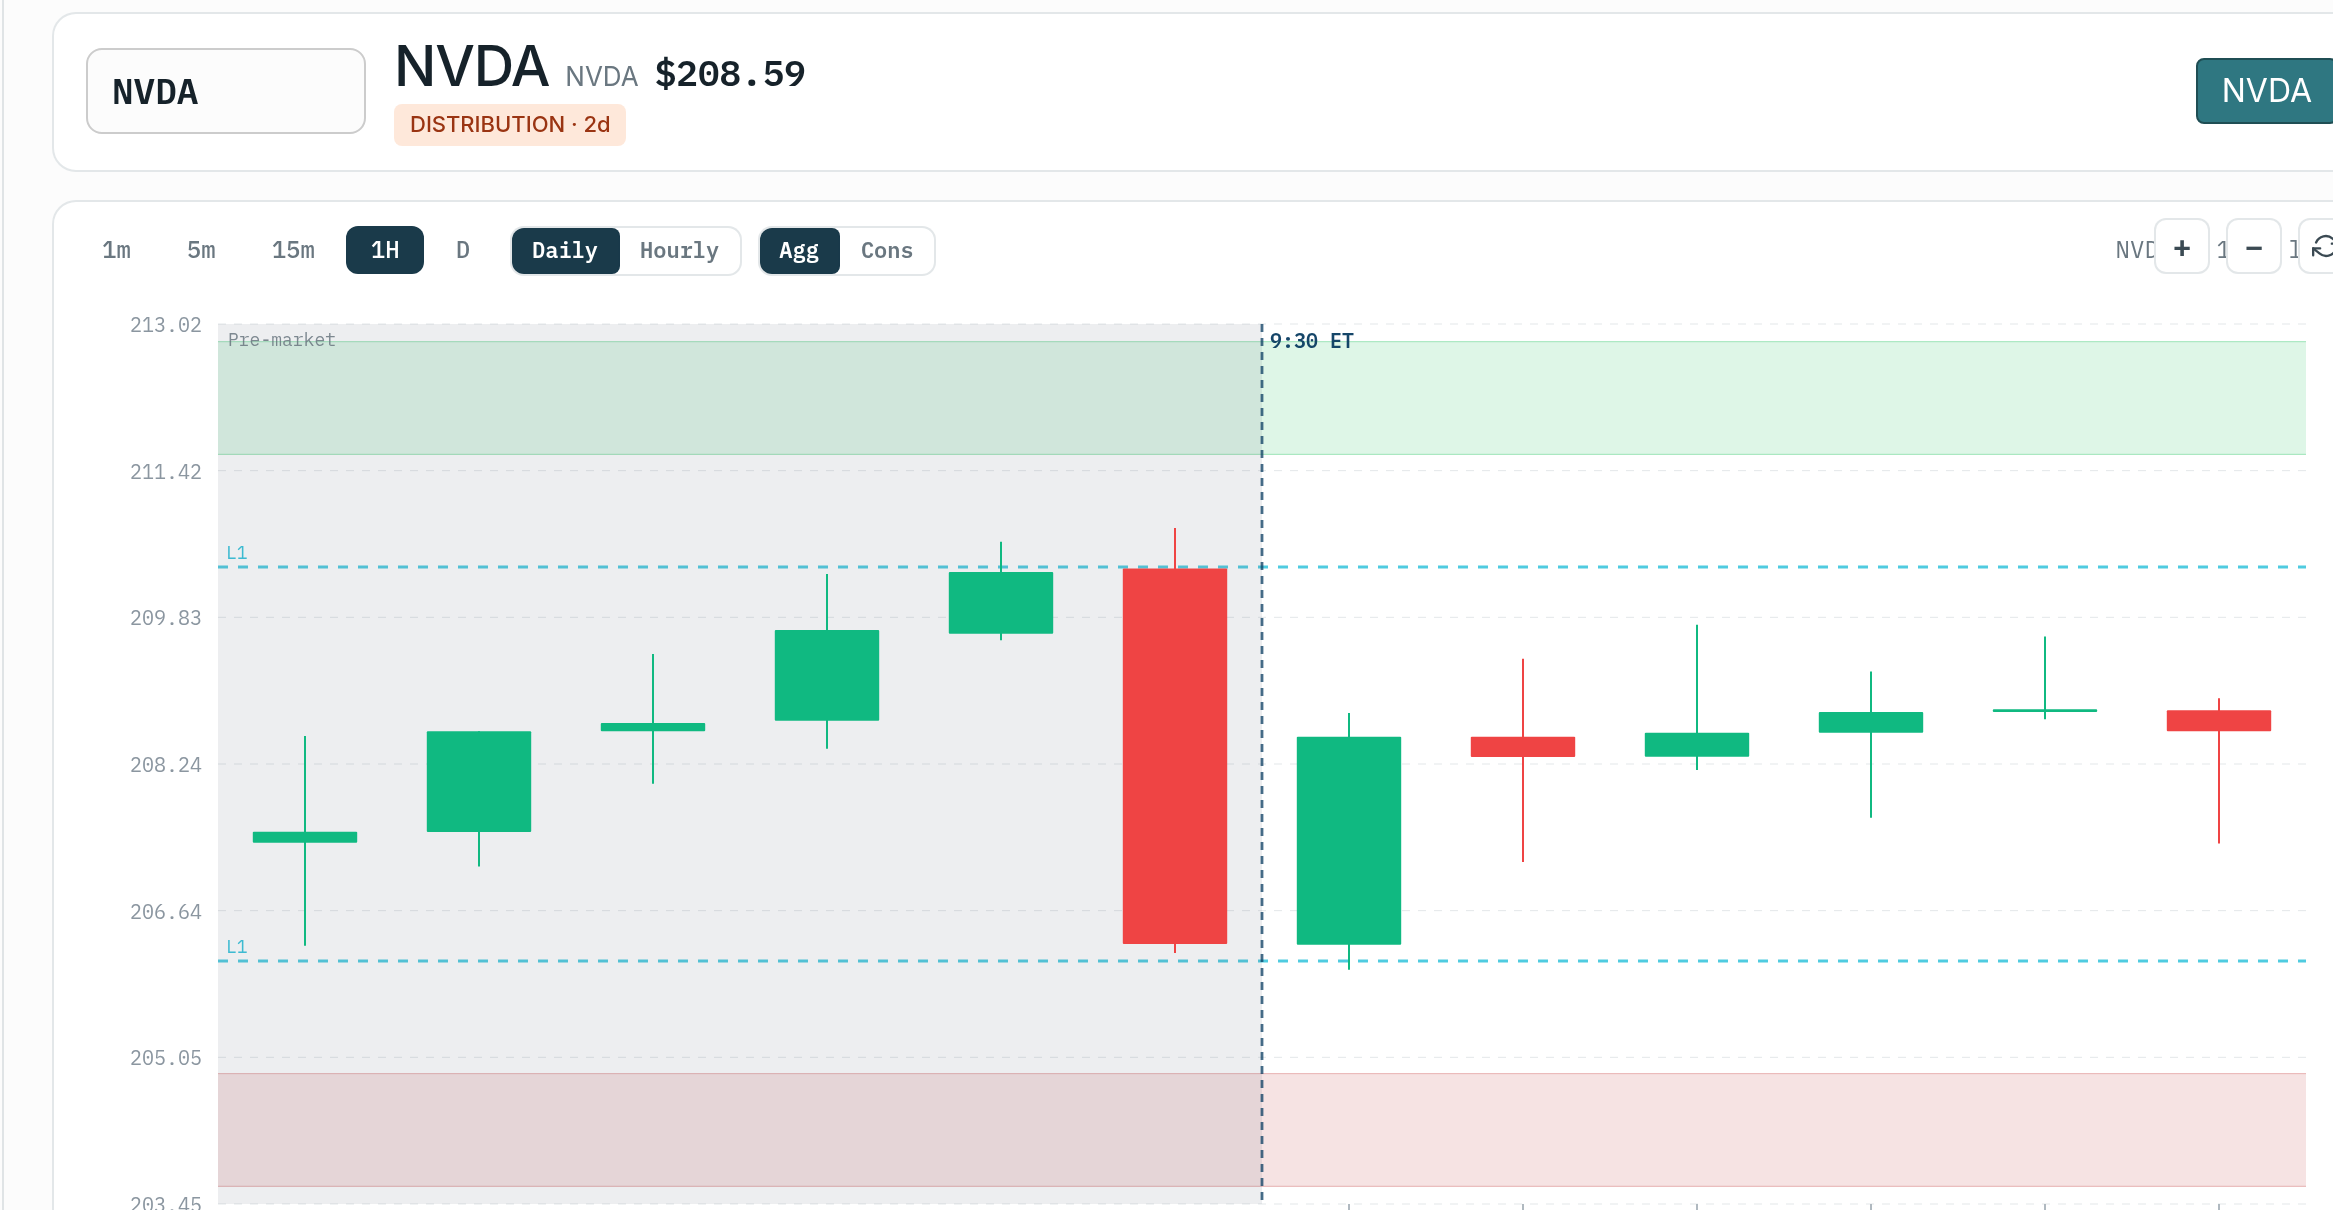
Punch one is the breach: price tags at least the aggressive cloud, giving you a volatility edge at a statistically stretched level. Punch two is the Edge Signal arrow confirming the move is running out of steam and starting to reverse rather than just continuing to run. You are not chasing price, and you are not predicting a top or a bottom; you wait for price to reach the edge and for the confirmation to print, then trade the turn with risk defined by the model itself.
Get the directions right: the orange clouds sit below price and frame longs, so a long-side breach is price dropping into the lower orange cloud, where you look for a green Edge Signal arrow. The green clouds sit above price and frame shorts, so a short-side breach is price pushing up into the upper green cloud, where you look for a red arrow.
The Two Breaches You Punch From
Before the layers, decide which breach you are trading. The Volatility Box gives you two, built in 2018 by quant traders and engineers as an instant framework for price and volatility:
- Blind breach: price hits the inner / top edge of the clouds, stays inside, and bounces. This is the classic, clean breach and the core first setup. Punch one is the breach; punch two is an Edge Signal arrow in the trade’s direction. Use your favorite timeframe for the entry.
- At-the-edge breach: price pushes to the outer edge of the clouds, a deeper pullback. Because price has stretched further, you can put the stop outside the clouds, giving the trade more room and a shot at a bigger reward. At-the-edge paired with the conservative models is about as conservative as it gets; if price keeps running beyond the conservative at-the-edge level, there is no wider model left and you are better off sitting out, because volatility is simply too high in that name.
Key Components
Entry Conditions
A valid setup needs the breach and the confirmation to line up: price tags at least the aggressive cloud (punch one), the Edge Signal arrow prints in the trade’s direction (punch two), and the move shows signs of one side losing control. The setup is strongest when the breach is also with the trend, which you read from Market Pulse.
Stop Placement
On a blind breach, the stop sits on the far side of the clouds, far enough to absorb normal noise but where price would clearly invalidate the idea. On an at-the-edge breach, you place the stop just outside the outer cloud, since price has already pushed to that outer edge. Stops are sized to current volatility rather than a fixed dollar amount, which is what keeps normal fluctuation from chopping you out before the setup works. Conservative traders stay wider; aggressive traders can tighten using a lower-timeframe read.
Profit Targets
Take the first target at a 1:1 risk/reward to reach break-even quickly. The second target is the gray target line on the opposite side of the box, the model’s expected full reversal. After the first target, move the stop to break even so the rest of the position carries no risk.
Executing the One-Two Punch Trade
Step 1: Identify the Breach
Confirm price has breached at least the aggressive cloud, decide whether it is a blind breach (inner edge) or an at-the-edge breach (outer edge), and check that you are trading in the direction the trend supports. When the breach lines up with the trend, it justifies a full position within your risk plan.
Step 2: Wait for the Second Punch
Wait for the Edge Signal arrow to confirm the direction, green for a long-side breach, red for a short-side breach, before price travels too far. This is the difference between trading a real reversal and catching a knife. Size to your risk rules, never risking more than your set percentage per trade.
Step 3: Set the Stop
Place the stop on the far side of the clouds for a blind breach, or just outside the outer cloud for an at-the-edge breach, to allow normal fluctuation while keeping a clear invalidation point. Width is set by current volatility and the breach type.
Step 4: Manage the Targets
Take the first target at 1:1, then move the stop to break even immediately to lock in a risk-free trade. The second target is the gray target line, the model’s projected full reversal. This tiered approach secures gains while leaving room for the rest of the move.
Adding Confirmations
Trend (Market Pulse)
The strongest one-two punches are with the trend. Market Pulse groups the daily trend into one of four stages, Accumulation and Acceleration lean long, Distribution and Deceleration lean short, so there is no subjectivity. Buying a long-side breach inside an uptrend is a much higher-probability play than buying one inside a downtrend.
Keltner 3.0 Wedges and the Momentum Cross
For extra confirmation, look for price closing outside the 3.0 Keltner channels (a price edge supporting the volatility edge) and for the 3 EMA crossing the 8 EMA, the momentum cross that is the final tick confirming the turn is underway.
Multi-Timeframe Confirmation
Use a higher timeframe for trend context and a lower timeframe for precise entry. The combination keeps your trade aligned with the bigger picture while letting you enter with tighter risk.
Common Mistakes
Entering Without the Second Punch
Trading the breach alone, without waiting for the Edge Signal arrow, invites false reversals. The breach is only punch one. Wait for the confirmation every time, even when the setup looks likely.
Ignoring Cloud State
When the clouds compress or invert, volatility is too high and the breach is not a clean edge. Sit out or trade only with the obvious pressure rather than fading into it. Choppy, compressed conditions produce whipsaws.
Holding Too Long After the First Target
Not moving the stop after the first target can turn a winner into a loser. Move to break even (or take partial profits) right after the first target to protect the gain while staying in for more.
Why It Works
The One-Two Punch pairs a volatility trigger (the breach) with a momentum confirmation (the Edge Signal), so trades are grounded in observable market behavior rather than prediction. Fixed entry, stop, and target rules remove emotion, the confirmation requirement filters out weak setups, and volatility-sized stops adapt to conditions instead of being a fixed distance that gets chopped. Trading only when both punches land, and favoring breaches that go with the trend, keeps risk managed on every trade.
Related
Was this article helpful?
Still need help?
Can't find what you're looking for? Our support team is here to help.
Contact Support